سایت هنر بونسای art of bonsai
این هم یک سایت بسیار خوب در مورد بونسای که تصاویر بسیار زیبیای برای ایده گرفتن داره
+ نوشته شده در پنجشنبه هجدهم فروردین ۱۳۹۰ ساعت 17:54 توسط نارون
|
بعضی از پست هایی را هم که راجع به بونسای گذاشتم از همین سایت هست.
http://www.bonsai4me.com/index.htm
توی این لینک راجع به بونسای گیلاس و چری ها می بینید.
http://www.bonsai4me.com/AdvTech/ATCherryBonsaiProgressionSeries.html
توی این لینک راهنمای بونسای انواع گیاهان هست
http://www.bonsai4me.com/SpeciesGuide/SpeciesIntro.html
توی این لینک یک نوع پیوند را توضیح داده
http://www.bonsai4me.com/AdvTech/ATApproachGraftingforBonsai.htm
http://www.bonsai4me.com/AdvTech/ATthreadgrafting.htm
http://www.bonsai4me.com/AdvTech/ATthreadgraftingroots.htm
توی این یکی هم خم کردن و شکل دهی به ساقه ها همراه با تصویر هست که نشون یمده چطوری با سیم ساقه را به فرمی که دوست دارید در بیارید
http://www.bonsai4me.com/AdvTech/ATRafiaBending.html
http://www.bonsai4me.com/AdvTech/ATBendingThickBranchesTwo.htm
http://www.bonsai4me.com/AdvTech/ATBendingThickBranchesThree.htm
گالری تصاویر و فیلم اموزشی بونسای بونسای
http://www.bonsai4me.com/AdvTech/ATthreadgraftingroots.htm
امیدوارم استفاده ببرید و لذتی را که من از تصاویر بردم برده باشید.
|
|
The tree that is used in this photo series is a Fagus sylvatica/ European Beech. Beech have fairly pliable branches, but they also have thin bark which is marked easily by wire. Similarly, most coniferous trees, such as Junipers and Pines, have pliable branches on which this technique can be used. On the other hand many deciduous species, have brittle growth, that if bent too far, will snap. It is very important that great care is taken that branches are not broken from the use of over-zealous wiring.The branch in the foreground of this picture is approximately 1" thick; it is growing out towards the front of the tree though it actually emanates from the right-hand side of the trunk. It is necessary from a design point of view, for the branch to be moved so it grows to the right of the tree.
|
| |
 |
In this image you can see that ordinary black insulation tape has been used to protect the trunk prior to bending. The first layer of tape is wound with the sticky-side facing outward so that the adhesive does not stick to the bark; the tape is then wound around the branch with the sticky-side facing inwards. The result is a strong level of protection using a cheap and easily available material (compared to raffia). Application is even more straightforward than using raffia and removal after the branch has set is also much easier. The colour of the insulation tape is also less obvious than the raffia (though raffia can be dyed to a more appropriate colour prior to application). |
| |
This article illustrates the technique of grafting a new root system onto a field-grown Field Maple or Acer campestre that had been developed in the ground for 5 years.
It is strongly advised that the article ‘Approach Grafting’ is first read and understood before applying any techniques described in this article. A second useful and related article is ‘Threadgrafting New Roots’; both threadgrafting and approach grafting new roots are equally viable techniques and should be seen as techniques that can be used individually or in conjunction with each other.

This Acer campestre started life as a pencil-thin sapling in 2000. It was planted into the ground and allowed to grow freely for 5 years to encourage rapid thickening of the trunk.
At the time of planting, the sapling had a tourniquet applied above its existing root system to encourage a better nebari (surface roots) to develop as the trunk thickened in the ground. (For more details of this technique please see here). When the tree was harvested from the ground in 2005 (see image above), the tourniquet had produced very mixed results.

Spring 2005: After pruning of the rootsystem. The tourniqueted roots had, as required, all appeared at the same height on the trunk and their appearance was acceptable. However I felt that they could still be vastly improved. Only three thick, untapered roots were visible from the front of the tree and roots were largely absent at the back of the trunk altogether.
The newly harvested Maple was planted into a nursery container to allow the tree to recover with a view to carrying out further work on the roots in the following Spring.
Spring 2006: A year later and the tree had recovered from the previous year's harvesting and root pruning well, and as is typical with all Acer species, had rooted strongly through the year.
The image above shows the back of the tree with its surface roots uncovered during repotting. The original wire tourniquet can still be seen embedded into the bark. Though there are roots at the back of this trunk, they are too low and new roots are needed in the middle of the area circled in red to create a radial root spread.
I had tried to prompt new roots in this area during 2006 by drilling holes in the trunk (these are then filled with rooting hormone and can sometimes prompt new root growth around the wounds). Unfortunately, in this case it had just prompted a sucker above one of the three holes.
A few months later in June 2006 I approach-grafted 2 saplings to the front of the trunkbase and a further one at the back of the tree.
Notice in the image above that I had also 'split' one of the original thick surface roots. By removing a large amount of wood straight down the centre of the root whist retaining its sides, I had divided it into two live halves that, as they healed, became two new individual roots. The purpose of splitting the root like this was to create some root taper and ramification.
Another year later in 2007 I approach-grafted a further 4 saplings to the back of the trunk in order to produce a complete uniform surface roots around the base of the trunk.
In the image above it is possible to see aroot that has been grafted but not yet sealed and the tiny brass screw holding the sapling in place while it grafts into position.
Spring 2010: 3 years later and the grafts at the back of the trunk have healed well. Having been allowed almost free growth since 2006 to encourage a strong graft-union, the graft stock was then pruned back hard in early 2009 to encourage the sap to flow into the main trunk rather than continuing into the top of each grafted sapling itself.
Spring 2010: with all but one of the grafts having taken, I removed all traces of the original saplings and sealed the wounds (pruning Acer species during the Spring can result in bleeding or sap loss and I prefer to use wound healer to prevent this). On the right of the picture above it is possible to see where one of the grafts had not been secured tightly enough against the trunkbase during the grafting process and had therefore not successfully taken. I will graft a new sapling into this area later in the year.
With the tree taken out of its training container, it was then bare-rooted so the root system could be pruned thoroughly. Notice that in the image above the tree still has some of its original rootbase.
Now that there is a sufficient surface root structure to support the tree, as much live wood as possible was then removed from the base of the rootball using a combination of knob cutters and a carving tool.
This technique encourages new roots to emerge from the existing surface root structure, in turn creating a flatter root system and better development of the nebari and trunkbase in the future.
Close-up image of the thick front root that I split into two in the Spring of 2006. The two approach grafts at the front of the tree back in 2006 have not taken 100% and have simply been pruned back hard for the time being and will be allowed to grow freely throughout 2010 to ensure they graft securely.
After removal of the base of the trunk and along with it, all of the original saplings rootsystem has produced a flat rootsytem
Spring 2010: Finally, the Maple was potted up into a large mica training pot while the branch structure continues to be developed.
Current height of the tree is 12"/30cm, with a trunk diameter above the roots of 3.5"/8.5cm
'Free' grafting, where a new branch or shoot is made using a scion completely separate from the donor plant (prior to grafting), is a difficult technique to master. Free grafts have a failure rate, even when carried out by experienced nurserymen; for the amateur, the failure rate can be high.
Alternatively, approach and thread grafting techniques utilise a scion to make a new branch or shoot that is still attached to the donor plant (often the same plant that also receives the graft) and the scion is not separated from its donor until it is has successfully grafted in its new position.
The fact that its donor supports the scion until the graft has taken, makes approach and threadgrafting a much safer and easier technique than free grafting, even for the beginner.
Before opting to graft new branches onto your tree, consider whether it would easier and quicker to simply hard prune your bonsai to prompt budding from the trunk. Very hard pruning of most deciduous and broadleaf trees during the Winter will encourage back budding from the trunk in the Spring.
However, if the branch structure of your bonsai is already well developed and ramified, and therefore hard pruning is not an option, thread or approach grafting can be a very useful technique to employ.
This is article explains the process of approach grafting. Though similar in principle to threadgrafting, approach grafting is more difficult to carry out and accomplish successfully (though it is not beyond the means of any enthusiast).
I would recommend familiarising yourself with the principles of threadgrafting prior to attempting approach grafting.
Approach Grafting for Bonsai
The technique of threadgrafting sees the scion (the new shoot that is to be grafted) threaded through a hole made in the wood of the tree that the scion is to be grafted to.
In approach grafting, the scion is pinned against the edge of the wood (bark and cambium layer) until such time that the scion grafts (or merges) to the wood of the tree.

Approach graft of a new branch at the side of a trunk-chop on an Acer palmatum bonsai. This will not only create a new branch in the middle of some scar tissue that would otherwise remain bare, but also help speed up callusing or the cicatrisation of the existing large wound.
Approach grafts should be seen as an alternative to threadgrafting; both techniques will fulfill similar aims, however both techniques have advantages and disadvantages over each other.

As can be seen in the image of the Root Over Rock Field Maple (Acer campestre) bonsai above, both techniques can be used in similar situations as and where they are best suited.

The graft on the left (a) is an approach graft; the graft on the right (b) is a threadgraft. Both techniques have been used to add new ‘roots’ to the tree.
Advantages and Disadvantages of Approach Grafting over Thread Grafting
One of the principle advantages of approach grafting is that the foliage does not need to be removed from the scion in order to carry out the graft. This makes it suitable for coniferous species such as Pine/Pinus and Juniper/Juniperus.
Approach grafts are also easier to apply in situations where the wood to which the scion is to be attached is thick in diameter, making drilling a hole difficult or impossible. And because the trunk does not have to be drilled, unlike with threadgrafts, several approach grafts can be applied close together.

Four field maple seedlings approached-grafted to the back of a much larger field maple bonsai
The trunk of the field maple above is approximately 4” in diameter. Four field maple seedlings have been attached to the back of this trunk to create new surface roots and an improved nebari; this would not be as easy to carry out with 4 threadgrafts in such a confined area. Using approach grafts in the above situation also means that the thick trunk does not have to be repeatedly drilled nor will the trunk have 4 threadgraft-exit scars being created in full view of the front of the tree.
There are of course, disadvantages with approach grafts that must be taken into consideration. Firstly, approach grafts are not as ‘clean’ as threadgrafts. Rather than the simple entry and exit hole of the threadgraft, an approach graft requires that a strip of bark be removed in order that the scion is attached. Even after the graft has taken and the area has calloused and healed over, the scar can on occasions look unnatural and therefore be visible.
Whereas when a threadgraft is severed, there is only a small entry hole to callus over, the strip of damage to the bark can take longer to heal.
Successful approach grafts are also more reliant on the tree species having a thick bark/cambium layer and strong callusing/healing characteristics. Approach grafting is less suitable for tree species with thin bark, slow healing/callus formation characteristics and in particular, a susceptibility to the cambium layer dying back around the edges of wounds.
Finally, if all goes wrong and the graft does not take, a threadgraft at worst will leave you with two small holes/round uro in the trunk whereas a failed approach graft can leave a nasty and visible scar.
In summary, while approach grafts can be used to great effect and are fairly straightforward to carry out, it much harder to know when and where to utilise them. Great consideration has to be given to the tree species to be used, the position of the graft, the visibility of any resulting scar tissue and the health and vigour of tree in question. It is important that both the scion and tree to be grafted are growing strongly to maximise callusing, healing and minimise the time taken for the graft to take and for any resulting scars to heal over.
As a general guide, I would suggest considering approach grafts for all Acer/Maple species (red leaved varieties are much less suitable due to reduced vigour), Ulmus/Elms, Ficus/Figs, Pinus/Pines and other similar coniferous species with thick cambium/bark such as Picea/Spruce, Cedar/Cedrus, Larix/Larch and Chamaecyparis/Cypresses.
To gain experience with approach grafting, Trident, Mountain maples or Ficus species are by far the best subjects to start with due to their superior growth rates and callusing/healing abilities. I would also suggest practicing on ‘potentsai’, that is, developing trees being grown in training pots that are exhibiting vigorous growth rather than slower growing specimens in bonsai pots.
The Process of Applying an Approach Graft to an Acer Palmatum (Japanese Maple) Bonsai to Produce a New Branch
The subject of these images is an Acer Palmatum or Mountain Maple Bonsai with a thick trunk that has a ‘blank spot’ where a branch is needed but no new shoots or buds have previously appeared.
A second purpose of this particular graft is that the new branch will speed cicatrisation of the existing large wound that resulted from the removal of a large branch 2 years previously.

The first part of this process is to mark exactly the point where it is intended for the new branch to 'emerge' from the trunk when the graft has finally healed over. In this case I have used a black marker pen.

With a very sharp knife, the cambium layer and bark is cut away along the intended path of the graft. Try to take care to make a channel just large enough to accept the scion without damaging the bark of the scion itself.

The wood within the channel is then removed; I have used a Dremel in this case but hand tools are more than adequate for the job. It is important that the channel is deep enough for the entire scion to be seated at or just below the level of the trunk, where possible. This will eventually produce a cleaner scar and make the initial fixing of the scion easier.

I am using a scion or 'donor' shoot from the same tree. This is a shoot from a different part of the tree that has been allowed to grow long enough to be bent into the grafting position.
A branch from a separate tree can be used, however bear in mind the practicalities of keeping a separate tree in position while the graft is taking. The scion must be of the same genus as the tree to which it is to be grafted; it is normal that the same species and/or variety is used to ensure that the bark and foliage of both scion and grafted tree are the same. However, it is not unusual for the foliage of one Pine or Juniper species to be grafted to another
It is paramount to the whole process of approach grafting that the scion will be fixed very firmly into position.
Secure fixing of the scion ensures that the graft does not move around and break while healing. It also ensures that the scion cannot be 'rejected' or pushed away by the cicatrisation/callusing of the trunk. Be wary that even after the graft has fully taken, it will be some years before the scion is held strongly in place by the new scar tissue. Securing the scion manually now will save the accidental break of the graft in future years.

There are a variety of methods for securing the scion. Avoid using steel but copper, brass or aluminum are suitable. I like to use ordinary aluminum or copper bonsai wire. However tacks, pins or screws can also be used. Circled above are two 1.5mm pilot holes I have drilled so I can insert a staple made from 1.5mm aluminum bonsai wire.

The staple is then placed into the holes...........

.........and carefully hammered down to firmly secure one end of the scion. A second aluminum wire staple is used to secure the scion within the channel. In the future, when the surrounding area has fully healed, I will remove any visible parts of these staples but it does not matter (and is simpler and easier) if the staple is simply swallowed up by scar tissue.

Finally, the entire graft is sealed with cut paste/wound sealant. The scion will now be left to grow as strongly as possible to encourage faster healing. Notice that the leaves on the entry side of the scion have been removed. For the faster grafting you want to encourage as much growth on the exit side (the new branch side) of the graft; to do this remove all leaves and any new buds or shoots that appear on the entry side.

On this particular tree I would estimate that the graft will be ready to separate in late Summer next year.
When the area (a) has healed over you can see that the point of emergence of the scion from the trunk will be exactly where I had originally intended it to be.
As with threadgrafting, notice that the scion has been positioned so that the first internode is very short and the first node or leaf-joint (b) is close to where the new 'branch' emerges from the grafting point. This is very useful for future branch construction, ramification and division.
The staple at (c) holds the scion firmly in place; when the graft has taken, the base of the scion at (c) will be separated and the staple removed.
Severing the Approach Graft

As with thread grafts, when the exit side of the approach graft (b) is noticeably thicker than the entry side (a), you can tell that the scion or graft is being supplied with nutrients from not only the original pathway along the scion, but also via the grafting point.
Again, as with threadgrafts, sever the scion a distance away from the point of grafting to allow the tree opportunity to adjust its sap flow and reliance on the grafting point itself to support the scion.
Reduce the length of the scion slowly over the course of a few weeks until such time that it can be removed entirely.
Timing
Approach grafts can theoretically be carried out at any time of the year; but the timing is best decided according to the precise needs and risks of the individual graft you are carrying out.
In general, I much prefer to carry out approach grafts during the growing season as callusing and wound healing of both the scion and reciprocating branch or trunk is immediate.
At this time there is no (or very little) danger of the edges of the channel (into which the scion is introduced) dying back as can happen with some deciduous species during dormancy. Where dieback of the edges of the channel occurs, it can take much longer for the graft to take.
How long does an Approach graft take?
A commonly asked question with regard to approach grafting is ‘How long does the graft take and when can it be severed'?
There is no definitive time period that I can state here; so much depends on the vigour and growth rate of the scion and the limb to which the graft is attached, the time of year that the graft is made and the type of tree that is being grafted.
For instance, a very vigorous Ficus grafted during the growing season might successfully graft and be severed within just 2 to 3 months whereas a slow-growing coniferous tree might take 3-4 years.
However, for the majority of grafts made on fast growing deciduous and coniferous trees during the growing season, successful grafting and separation can be expected within one and two years. Typically the Acer approach grafts I have illustrated in this article were taken at midsummer and will be ready to separate during late Summer next year.
Prunus incisa 'Kojo-no-mai', or as it is more commonly known, the Fuji Cherry is an excellent subject for bonsai cultivation. It is frequently available in Garden Centres and nurseries in the UK and around Europe during the early months of Spring where it is frequently admired for its very early pink/white blossom in March.
Prunus incisa is a spreading, rounded shrub (as opposed to the more tree-like habits of many other Cherry species) also suitable for use as hedging material as it responds well to frequent pruning which in turn creates a dense foliage mass.
Leaves are oval shaped and can be reduced to just 1cm or less in length, showing a mid-green colour in summer followed by a vibrant orange red in autumn. Where spent flowers are left on the tree, small purple fruits appear in the Autumn.
The only real disadvantage that I see with this species, is that though relatively young examples are very frequently seen for sale, it can be difficult to obtain mature specimens with a substantial trunkbase.
A lack of decent trunk girth invariably requires that material needs to be greatly reduced in height for development as mame bonsai (bonsai under 6" in height).

The Fuji Cherry that is the subject of this article was originally purchased in 1997 as a nursery tree for £2. It was bare-rooted and planted into seramis (and type of fired clay I was using around this time) and grit then planted into a bonsai pot.
This was much earlier in my own process of learning bonsai and at the time I was reasonably satisfied with the results. I was simply looking forward to the tree flowering the following year rather than concerned by what I would now consider to be a trunk that was much too tall for its girth (making the trunk look skinny and immature).

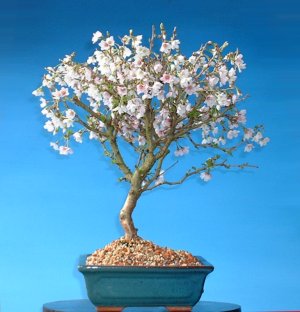
March 2000: the following year the Cherry bonsai flowered and indeed the results were very pleasing. The sheer volume of flowers that appeared across the branches made a spectacular sight!
I had allowed the natural upright-branching habit of the Cherry to prevail in the design of the bonsai and this produced a natural informal broom.
However, the tree still looked very immature, particularly during the growing season. After flowering had finished, the 15"/37cm tall tree was simply a slender (1"/2.5cm diameter) trunk with a mass of small green leaves sat on top and was far from impressive to look at.
By the time flowering had finished 3 years later in 2003 I knew I had to do something about the actual structure of the bonsai to improve its appearance year-round.

Late May 2003. I decided that to make the the tree look more impressive, I would need to greatly reduce the height of the trunk and then regrow the branch structure.
With the trunk still only approximately 1"/2.5cm in diameter, in order to achieve a suitable trunk height-to-girth ratio of 6:1, I would need to reduce the overall height of the tree to less than 6"/15cm.
So I began the process by pruning away the top of the trunk of the tree very hard and removing many of its branches after flowering had finished.
I then airlayered the trunk near its base. This allowed me to incorporate the subtle bend low down in the trunk for better trunk movement, thicken the trunkbase of the new tree (through the natural tendency for the airlayer site to swell), develop a good spread of surface roots and reduce the height of the tree, all at once!
As with many bonsai techniques it is subjected to, the Fuji Cherry responded well to being airlayered and by the end of June 2003 had produced a mass of new roots. The base of the tree was removed and the now much smaller bonsai was planted up into a bonsai pot.
Note the effect of the airlayer-base swelling where the new roots have emerged from the cambium layer. On a trunk only 1" in diameter, this swelling amounts to a considerable improvement in the girth of the trunkbase!
By May 2004 the new structure of the bonsai had been established, the trunk had been considerably reduced, a new nebari (surface roots) had been developed and a new foliage mass had grown.

With a new height of just 3.5"/9cm, the dimensions of the tiny cherry bonsai could only be truly understood when seen in context, as the picture of the tree above illustrates.
For the next 6 years the tree went through a development cycle of being allowed to grow before being pruned back very hard in the Autumn after leaf-fall. The heavy autumn pruning ensured that there were plenty of new buds appeared in the very small area of the upper trunk to create a foliage mass the following year while also trying to ensure that the trunk did not lose its taper.
Whilst mame bonsai do not require the many years of vigorous growth required by larger trees to achieve a large girth, they do require much more time to develop trunk taper and branches with short internodes.
.JPG)
March 2010. The Cherry bonsai seen in early Spring with its new flower and leaf buds appearing. The flower buds are relatively easy to distinguish in this image as the light pink of the flowers' petals can be easily seen; however at this stage the leafbuds are still small and will not begin to open until flowering has almost finished.

Early April 2010. Over the past 6 years since airlayering the tree, the roots have lignified (the wood has become mature) and have thickened producing a pleasing nebari and trunkbase. The rectangle pot from Walsall Ceramics is just 2cm deep and 11cm wide but the tree happily grows in the very limited volume of soil even through the heat of the summer.

Early April 2010: With the whirls of new leaves just beginning to open, the Cherry Bonsai is seen in flower.
Height of the tree: 3.5"/9cm tall with a 4cm/1.5" wide trunkbase (above the roots).

Finally, a close-up of the beautiful soft pink flowers of Fuji Cherry/Prunus incisa
|
|
|
|
February 2004.
|
 |
 |
The tree was lifted from its pot and the roots were cleaned of soil. The roots were found to have grown very vigorously since the tree was originally collected. A path up the trunk was found that would allow the trunk to be sawn in half from the rootbase up into the main body of the trunk. For the whole period that the tree was out of its pot (around an hour) the roots were misted frequently to ensure that they would not dry out.
|
| Given the necessity to work quickly and accurately, the trunk is sawn from below using a reciprocating saw. |  |
 |
A clear cut, straight through the trunk. Notice that the cut has been made between two major roots that grow beneath each side of the shari. |
|
.A piece of bamboo was then slowly inserted from the bottom of the cut, slowly forcing the split to open. Great care was taken that the cut/split was not allowed to continue unabated up the trunk. The tree was then repotted with the tree slightly rotated toward the right (with the bamboo still in place to hold the split open). Further work was carried out, the shari was extended higher up the trunk to encompass another wound from a previous branch removal; the shari and the split/cut were carved to create a more natural appearance and the previous small first branch was jinned.
|
 |
 |
Over the past few weeks, the shari has been painted with a mixture of lime sulphur and black paint to exaggerate the hollow.
For now, the tree will be allowed to recover and the next few years will be spent developing the branching and foliage density. At the time of writing, the tree has budded out very strongly for Spring and the only sign of weakness to the tree is in the first right branch just above the shari. |
جزوه میوه کاری ارشادی را می توانید از لینک زیر دانلود کنید که می توانید با این جزوه بسیاری از تست های سال قبل را بزنید و مفید هست
از این لینک می توانید جزوه تایپ شده دکتر صالحی را دانلود کنید
منبع سایت تهیه جزوه: دوستدار باغبانی
تقدیم به دوست خوبم گل یخ
برای اینکه بدانید چه نشریات و مجلاتی در ایران هستند که در زمینه کشاورزی فعالیت دارند به لینک زیر مراجعه کنید:
http://www.magiran.com/category.asp
برای اطلاعات بیشتر روی ادامه مطلب کلیک کنید


.JPG)
.JPG)


.JPG)
.JPG)


